The Thinking Behind a Branching Scenario
I just came back from ASTD’s TechKnowledge conference in Las Vegas where I held a Creation Station on how to create a branching scenario in Captivate. Whether you are using Captivate, Lectora, Articulate, or any other tool, it is certainly important to know which buttons to click to set it up properly. But it is even more important that you first set it up properly in your mind. Here’s the process I use.
Step 1: Make key structural design decisions.
- Is it an assessment or an exploration? Knowing this will help you with decisions about navigation and which tool features to use. If it is an assessment that is graded, you will probably want to use the test question templates in your authoring tool. If the scenario is designed to let the student explore situations and consequences and they will not be graded, then you can just use buttons with hyperlinks that can be set up more quickly. Also, if it is an exploration, you’ll may want to include options at every step that let the student to back and make a different choice on the previous question.
- How many choices will there be per question? Will it vary? Branching scenarios can get very complicated very quickly when there are a lot of different choices. The logic is simplest if every scenario has a right and a wrong (or good/bad) answer. Unfortunately, life isn’t always that black and white. You may need more choices for your scenario to accomplish your instructional objectives. If you will have more than two choices, make sure you know how much work you are signing up for.
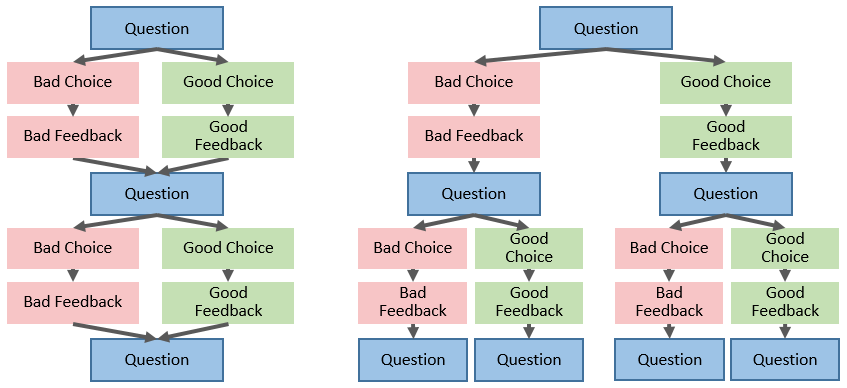
- Will different answers result in different questions or just different feedback? This is probably best described with an example. Let’s say you are creating a branching scenario about study skills where the student has to make choices such as whether to study for a test or go out with friends. The good and bad choices will obviously have different consequences. That’s the branching feedback. But then do both paths lead to the same dilemma next or to two different dilemmas? If both paths lead to the same choice next, such as whether or not to get started on a term paper due at the end of the semester, then you only have branching feedback and not branching questions, which is much simpler to set up. This is illustrated in the diagram on the left.
- If however, your choice inherently puts you in a different dilemma, then you need to have branching questions as well. Consider a customer service scenario. If you are polite to a customer or rude to that customer, each path has different consequences (branching feedback). But it also affects what dilemma you face next, because the customer has changed – the situation has changed. The customer treated well is likely to be respectful and helpful. The customer treated poorly is likely to be difficult or worse. So it wouldn’t make sense for both of those paths to come back to the same question. They each need their own follow-on question. This is illustrated in the diagram on the right.
Step 2: Map out the structure on “paper.”
Once you’ve made these key decisions, you can map out the scenario on paper—either physical paper, a whiteboard, PowerPoint, flow-charting software, etc. At this point, you don’t need to worry about writing out the full text of the scenarios, the choices, and the feedback. Instead, focus on the flow and conditional logic, perhaps adding a few key words if you want to about the topic of the choice or the gist of the feedback. Getting your logic and flow right is much more important than scripting the exact words.
At this point, I like to set up a numbering system. In the diagram below, Q is for question, F is for feedback, G is the good response and B is the bad response. This numbering convention makes sense to me. Yours doesn’t have to look like this—it just needs to make sense to you.

Step 3: Build and test the structure in your authoring tool.
Once you feel good about the structure, you can start building it in your authoring tool. Again, don’t worry about the full content and media. Instead, set up your pages, your buttons, your linking, your feedback, your go-back buttons, etc. Label everything according to your numbering scheme so when you test it out, you can make sure that if you click the button for the bad response on question 2 you go to the F2B feedback page.
Step 4: Add content and media.
Once everything is working properly, then you can add your content: the full text, images, audio, etc. This is the easiest part of the whole process because the hard parts have already been done. Now you are just copying and pasting everything on the correct slide based on your flow chart and the numbering convention you’ve set up.
Keep in mind that this is an iterative process. For example, you may have your map figured out, but when you start building it, you realize that in addition to giving the consequences of the choice, you feel the need to spend some time debriefing why it turned out that way. Because of that, you may need to add an extra slide between the feedback and the next choice.
If you’d like to try building one yourself, you can access the materials from my Creation Station. They include:
- The high-level map
- The detailed script
- Graphics
- Instructions on how to build it in Captivate (although you could try to improvise and build it in just about any authoring tool)
- A Captivate file with the structure only set up
- A Captivate file with the content added
Happy branching!
 Previous Post


I like the structure, that will be great. Seeing the question then seeing the result or outcome of your decision. Instead of seeing a bullet type of presentation this scenario type will be more interesting way.
Do you think it’s best to use Storyline or Captivate instead
of PowerPoint and Articulate Studio to develop a module using branching?
Great question! All four tools make it easy to do a branching scenario. You will have a few more options in Storyline and Captivate. For example, you might want a debrief slide where the student rolls over the different parts of the answer to see why it caused the consequence that it did. That sort of thing would be easier in Storyline and Captivate. Between the two, Storyline would be a little bit easier, in my opinion.
Thanks!
Great article! I realise this is a bit older now, but is there a chance you could fix the materials link to your creation station resources? I’d love to see the files mentioned.
Thanks for letting us know about the broken link. It’s fixed now.
Enjoy